
Create a Zelda-Style Heart System in Godot with Python/GDScript
Introduction to Creating a Zelda-Style Heart System in Godot
If you watched my Zeldalike dev-vlog, you probably saw my robust Zeldalike heart system and may be wondering how I created it. In this simple, accessible tutorial, we’ll walk through a step-by-step process for not only creating a Zelda-like heart system with dynamically-changing images, but also setting up a project with multiple components for easy, straightforward navigation and expansion as your project grows.
How to Get the Assets for This Project
You may follow this tutorial with your own assets, or you can download the recommended assets used for this tutorial from itch.io. The assets used for this tutorial are “Name your own price”, so you can grab them easily to set up your project!
Heart Hud
You can acquire the Heart HUD files from itch at any price you set by following the instructions below.
Navigate to the heart hud page on itch.
At the top of the page, click Download Now.
Either pay for the asset or click No thanks, just take me to the downloads.
In the new page, click Download next to Retro Inventory.zip.
Save the file somewhere you will remember, then open the .zip file.
Navigate to Retro Inventory/Original/ and copy the Hearts.png file to your computer.
(Optional): Delete the .zip file, as only the Hearts.png file is needed from it for this tutorial.
Complete Project Download
This is optional. If you would like a complete version of what is created in this tutorial, you can grab the finished project from my GitHub repository by following the steps below.
Click here to open the Zelda-Style-Heart-System github repository.
In the repository, click the <> Code dropdown, then click Download ZIP in the menu that appears.
The repository will be downloaded to your device.
How to Set Up Your Project
Create Your Project
Note: If you have not done so already, download the Godot engine.
Launch the Godot engine.
In the upper left of the Godot Engine Project Manager window, click + Create.
The Create New Project window will appear.Fill out the required information:
Project Name: The name of your project, such as “Zelda-Style Health HUD”.
Project Path: Where your project will be saved on your device.
Renderer: Choose Forward+.
Version Control Metadata (Optional): The version control system you will use, if any.
Check the box for Edit Now and click Create.
The Godot Engine will launch your project.
Configure Project Settings
In the Godot Editor, in the top menu, click Project, then Project Settings….
The Project Settings window will appear.In the left settings tree, under Rendering, click Textures.
Change the Default Texture Filter to Nearest.
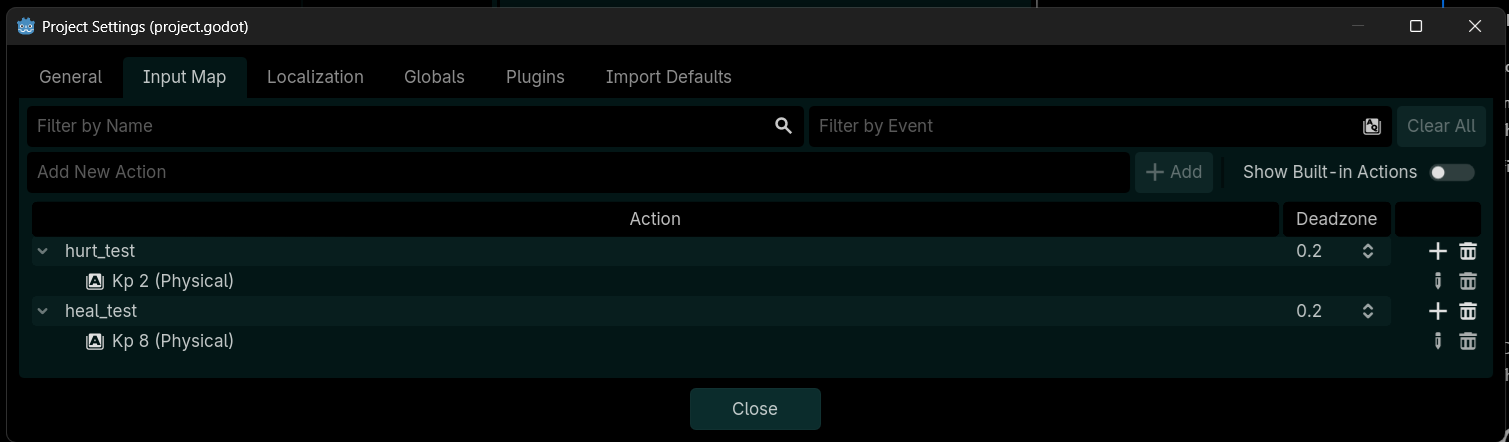
Note: This will properly render the pixel art used for this tutorial.At the top of the Project Settings window, click the Input Map tab.
In the Input Map tab, in the Add New Action field, type “hurt_test”, then click + Add.
The hurt_test input will be added.Repeat step 5 to create the heal_test input.
In the Action list, to the right of the hurt_test action, click the + button.
The Event Configuration window will appear.In the Event Configuration window, in the Listening for Input field, press 2 on your Numpad, or another key you wish to assign as your hurt_test input.
Click OK.
The chosen key will be assigned to the hurt_test action.Repeat steps 7-9 to assign 8 on the Numpad to the heal_test action.
Click Close.
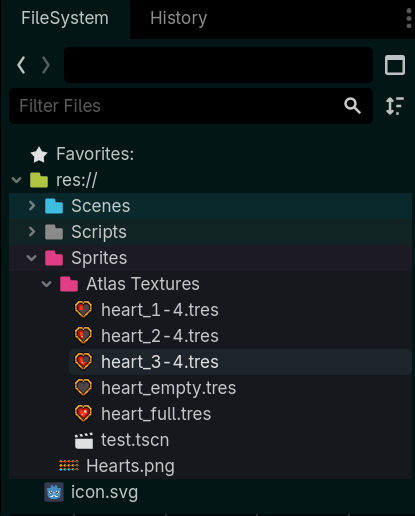
Create Your Folder Structure
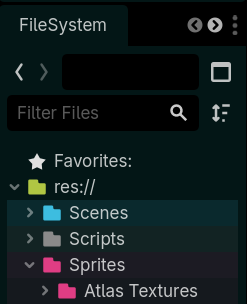
In the left hand sidebar, in the FileSystem tab, right-click the res:// folder, then click + Create New, then Folder…
The Create Folder window will appear.In the Name field, name your folder Scenes, then click OK.
Your folder will be created.Repeat Steps 1 and 2 to create the Scripts and Sprites folders.
Right-click the Sprites folder, then click + Create New, then Folder… to create a new folder within the Sprites folder.
Name the new folder Atlas Textures, then click OK.
(Optional): Right-click a folder, click Set Folder Color…, then select a color to apply to that folder and its contents. Repeat this for each folder if desired.
Atlas Textures
Now we need to set up our Atlas Textures. This is how we will define what sprite should appear for each stage of the heart. A heart can have one of the following five sprite stages:
Full
3/4 Full
2/4 Full
1/4 Full
Empty
To do this, we will first add our Hearts sprite sheet to the Sprites folder, then we’ll create new resources in the Atlas Textures subfolder for each heart stage.
Add the Hearts Sprite to the Sprites Folder
Locate your Hearts.png file on your device.
Click and drag Hearts.png into the Godot Editor, then, in the FileSystem tab in the left hand sidebar, drop it into the res://Sprites/ folder.
Hearts.png will appear in the Sprites folder.
Set Up the Base Atlas Texture for the Hearts
In the left-hand sidebar, in the FileSystem tab, right-click Atlas Textures, then click +Create New, then Resource….
The Create New Resource window will appear.In the Create New Resource window, in the Search field, type “Atlas”.
The contents of the Matches section will narrow.In the Matches section, double-click AtlasTexture.
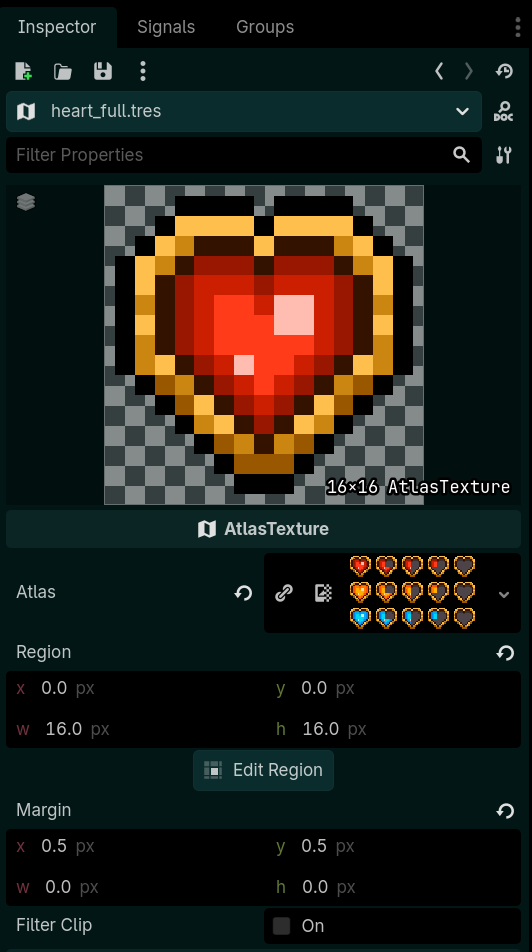
You will be prompted to save your Atlas Texture.In the File: field, name your texture “heart_full.tres”.
Click Save.
The heart_full.tres resource will be added to your Atlas Textures folder.
Note: You may need to click the arrow next to Atlas Textures to expand the folder for the new heart_full.tres resource to become visible.Double-click the heart_full.tres resource.
The Inspector tab in the right-hand sidebar will change to show the heart_full.tres resource’s details.Click and drag the Hearts.png file in the Sprites folder into the Atlas field that is currently <empty> in the right-hand sidebar’s Inspector tab.
The texture field at the top of the heart_full.tres inspector will change to show the full Hearts.png file.
Create the First Atlas Texture
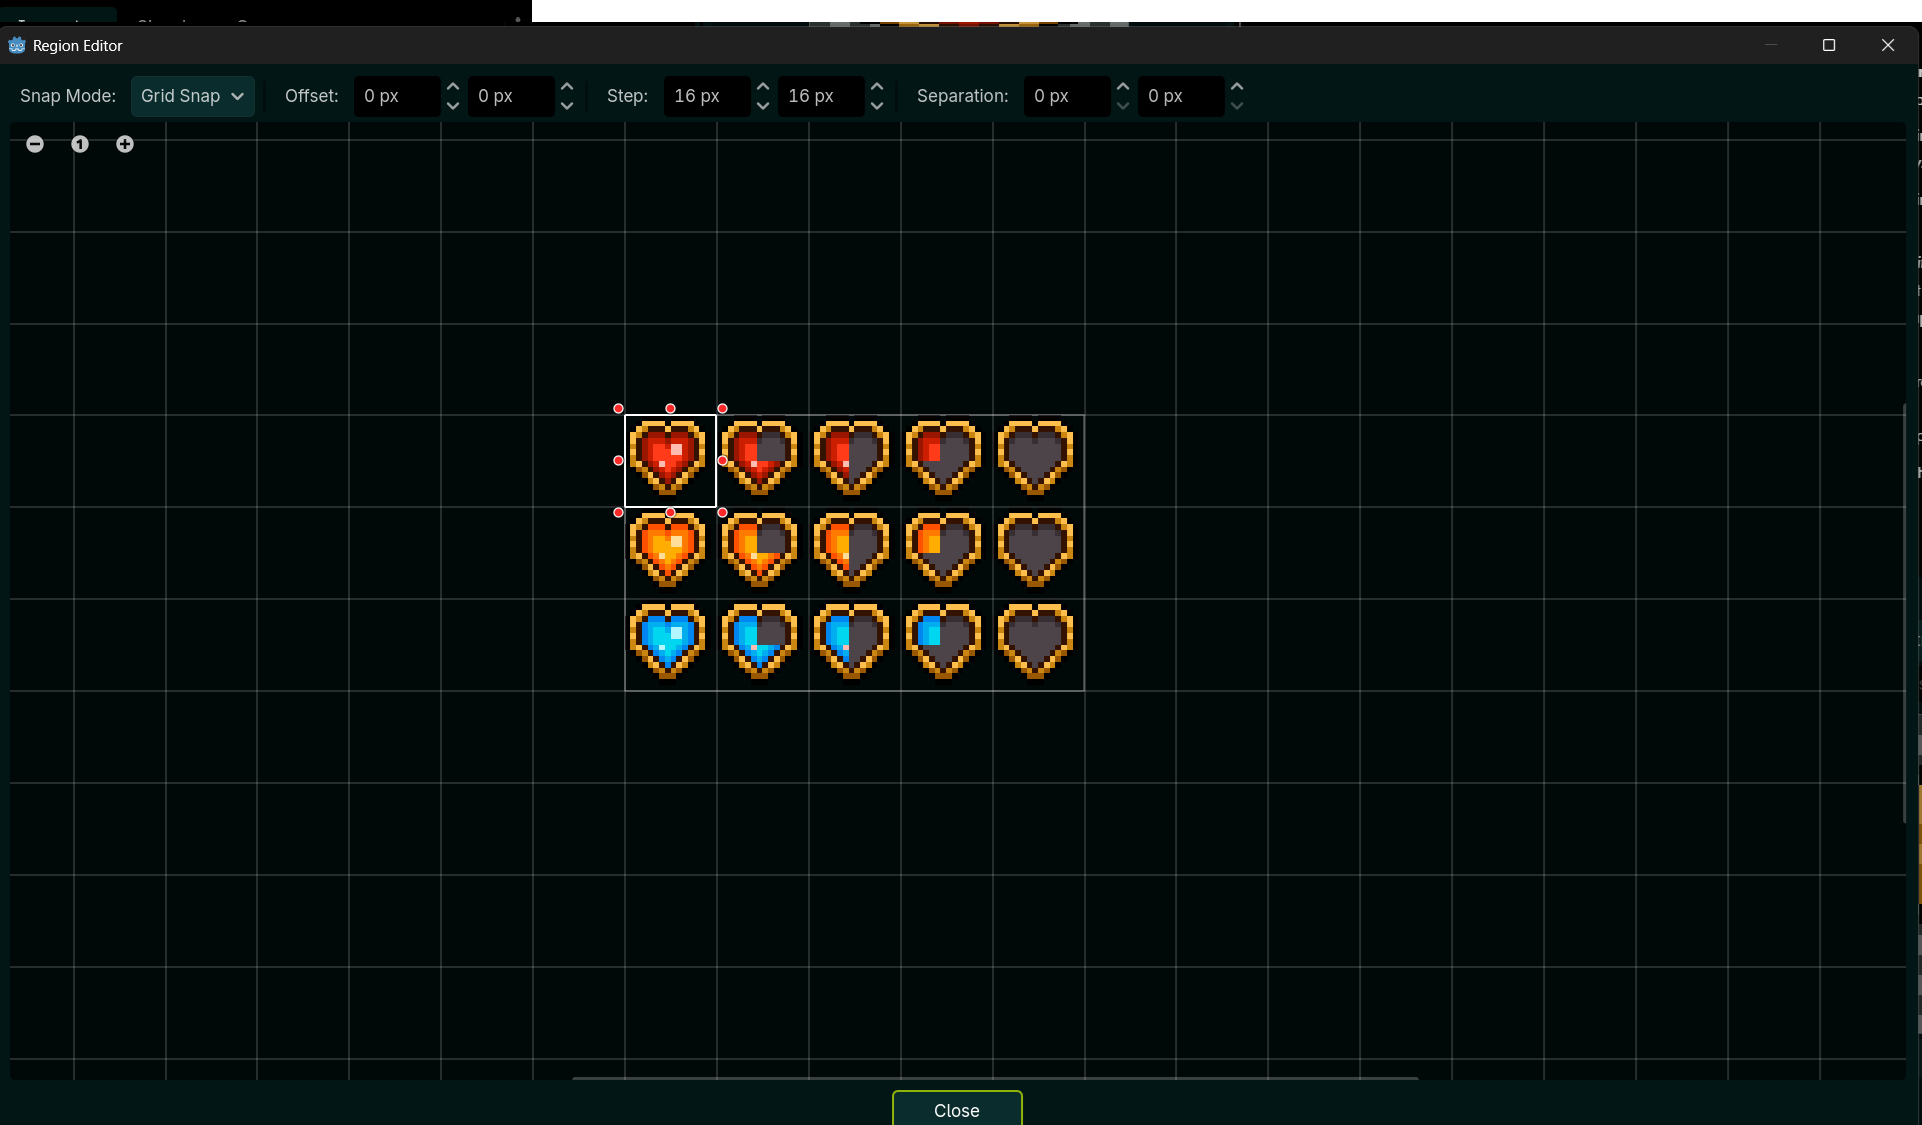
In the right-hand sidebar, in the Inspector tab, in the AtlasTexture section, click Edit Region.
The Region Editor window will appear.At the top of the Region Editor window, click None next to Snap Mode:, then click Grid Snap.
A grid will appear in the window.At the top of the Region Editor window, change the Step values to “16” and “16”.
The size of the grid will increase.In the grid view of the Region Editor window, click the bottom right corner of the bounding box and drag it to the bottom right corner of the first heart.
Note: If you enabled Grid Snap and set the Step to 16x16, it will snap perfectly into place.Click Close.
Your heart_full.tres Atlas Texture resource will now show the full heart image in the inspector’s texture field, rather than all of the hearts.
Note: The Atlas value in the inspector will not change.In the Inspector, under the Texture settings, change the x and y values of the Margin fields to “0.5”.
Create Additional Atlas Textures
In the left-hand sidebar, in the FileSystem tab, right click the heart_full.tres Atlas Texture in the Atlas Textures folder, then click Duplicate….
The Duplicating file window will appear.In the Duplicating file window, rename the resource to “heart_3-4.tres”, then click OK.
The heart_3-4.tres Atlas Texture will be created.Double-click the newly-created heart_3-4.tres resource.
The heart_3-4.tres resource will become visible in the Inspector tab in the right-hand sidebar.In the right-hand sidebar, in the Inspector tab, under the AtlasTexture section, click Edit Region.
The Region Editor window will appear.In the Region Editor window, move the bounding box to the next heart over, representing a heart that is 1 less full than the previously-created heart.
Note: You can do this easily by clicking the top-right corner of the new heart, then dragging to the bottom-left corner.Click Close.
The heart_3-4 resource will now display a heart that is three quarters full.Repeat steps 1-6 to create heart_2-4.tres, heart_1-4.tres, and heart_empty.tres.
How to Create the Main Scenes
Create the Player Scene
While this tutorial covers how to create a Zelda-like, heart-based health system, we do need a player scene to make that function. The player will control how many hearts we currently have, what our maximum hearts are, and how we receive and take damage during testing. If you already have a player, you can simply create the Health Component detailed in this section and attach that to your player to make this code function.
Scene Creation
In the left hand sidebar, in the Scene tab, click2D Scene.
Your 2D Scene will be created.Press CTRL+S to save your scene.
The Save Scene As… window will appear.In the Save Scene As… window, double-click the Scenes folder to enter it.
In the file name field at the bottom of the window, name your scene “player.tscn”.
Click Save.
Player Setup
In the left hand sidebar, in the Scene tab, double-click the Node2D node.
You will be prompted to rename it.Rename the Node2D node to “PlayerRoot”.
Click the + at the top of the Scene tab or press CTRL+A to add a new node.
The Create New Node window will appear.At the top of the Create New Node window, enter “Node” into the Search field.
In the Matches field, double-click the white Node to add it to your scene as a child of PlayerRoot.
In the same manner used in steps 1 and 2, rename the new Node to ComponentManager.
Press CTRL+S to save your scene.
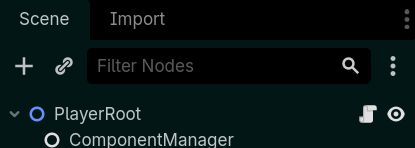
ComponentManager will not have any scripts attached to it. This Node will act as a folder into which we will place components. For this tutorial, we will only have the Health Component.
Create the Player UX Scene
Scene Creation
At the top of the godot engine window, next to the player tab containing your player scene, click + to create a new scene.
In the left-hand sidebar, in the Scene tab, click User Interface.
Your User Interface Scene will be created.Press CTRL+S to save your scene.
The Save Scene As… window will appear.In the Save Scene As… window, double-click the Scenes folder to enter it.
In the file name field at the bottom of the window, name your scene “player_ux.tscn”.
Click Save.
Player UX Setup
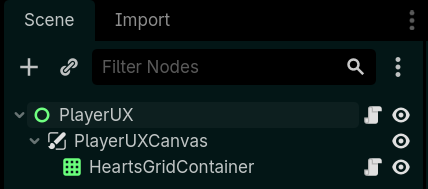
In the left hand sidebar, in the Scene tab, double-click the Control node.
You will be prompted to rename it.Rename the Control node to “PlayerUX”.
Click the + at the top of the Scene tab or press CTRL+A to add a new node.
The Create New Node window will appear.At the top of the Create New Node window, enter “Canvas” into the Search field.
In the Matches field, double-click the CanvasLayer node to add it to your scene as a child of PlayerUX.
Rename the CanvasLayer node to “PlayerUXCanvas”.
Right-click the PlayerUXCanvas in the Scene tab of the left-hand sidebar and click + Add Child Node….
Add a Grid Container to the scene as a child of PlayerUXCanvas.
Rename the GridContainer node to “HeartsGridContainer”.
In the Inspector with the HeartsGridContainer selected, change the following settings:
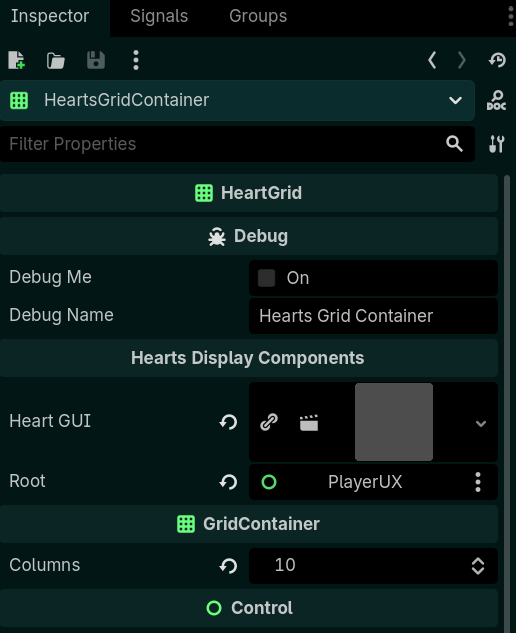
GridContainer/Columns:Set this to “10”.
Control/Theme Overrides/Constants: Set the H Separation and V Separation to “40”.
Control/Layout/Transform/Position: Set the x and y values to “16.0”.
Add a Panel as a child of HeartsGridContainer.
Rename the Panel node to “Heart”.
Right-click the Heart node and click Save Branch as Scene….
The Save New Scene As… window will appear.In the Save New Scene As… window, name the file “player_ux_heart.tscn” and click Save.
Your scene will be saved into your Scenes folder.In the Scene tab of the left-hand sidebar, right click the Heart node and click Delete.
The Heart node will be removed from the player_ux scene.Press CTRL+S to save your scene.
Add PlayerUX to the Player
Open the player.tscn scene.
Drag the player_ux.tscn scene from the Scenes folder into the Scene Tree, releasing while hovering over the PlayerRoot node.
PlayerUX will become a child of PlayerRoot.
Create the Heart Scene
In the left-hand sidebar, in the FileSystem tab, double-click the player_ux_heart.tscn scene in the Scenes folder.
The player_ux_heart scene will open.In the Scene tab of the left-hand sidebar, click the Heart node.
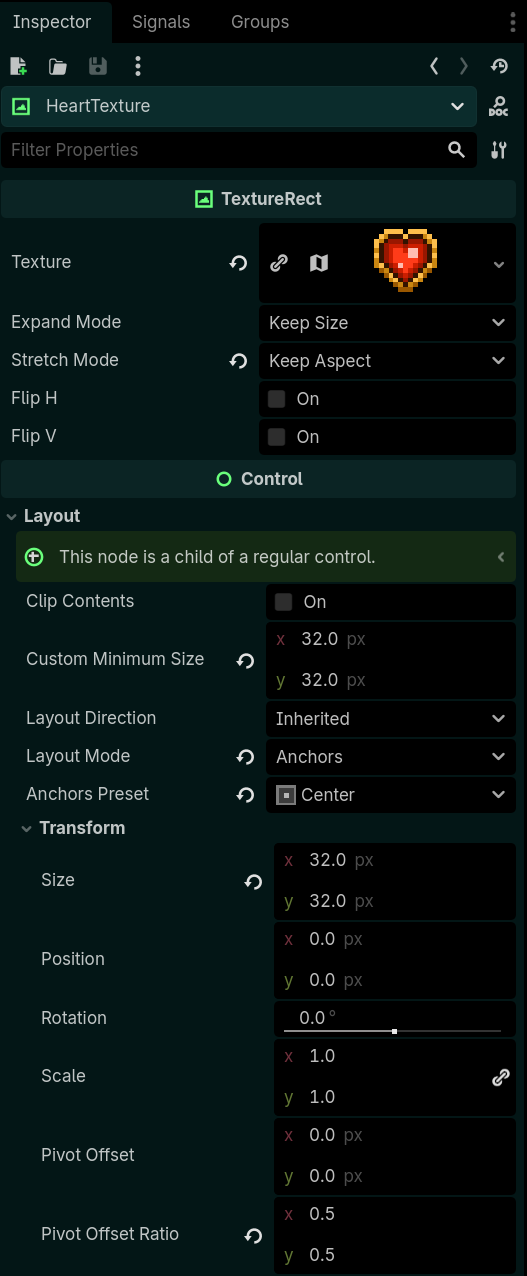
In the Inspector tab of the right-hand sidebar, configure the following settings for the Heart as follows:
Control/Layout/Anchors Preset: Set this to Top Left
Control/Layout/Transform/Size: Set the x and y values to “32.0”.
Canvas Item/Visibility/Self Modulate: Click the colored bar and, in the pop-up that appears, drag the A value all the way to the left.
In the Scene tab of the left-hand sidebar, right-click the Heart node and click + Add Child Node….
Add a TextureRect as a child of Heart.
Rename the TextureRect to “HeartTexture”.
With the HeartTexture selected, drag the heart_full.tres resource from your Atlas Textures folder into the Texture field of the Inspector on the right-hand side.
In the Inspector tab, configure the following settings for the HeartTexture as follows:
TectureRect/Stretch Mode: Set this to Keep Aspect.
Control/Layout/Custom Minimum: Set the x and y values to “32.0”.
Control/Layout/Layout Mode: Set this to Anchors.
Control/Layout/Anchors Preset: Set this to Center.
Control/Layout/Transform/Size: Set the x and y values to “32.0”.
Control/Layout/Transform/Pivot OffsetRatio: Set the x and y values to “0.5”.
Press CTRL+S to save your scene.
Create the Test Scene
At the top of the Godot Engine window, next to the player_ux_heart tab, click +.
A new scene will be created.In the Scene tab of the left-hand sidebar, click 2D Scene.
Rename the Node2D node in the Scene sidebar to “TestLevelRoot”.
In the FileSystem tab, click and drag player.tscn from the Scenes folder into the Scene tab above, releasing while hovering over TestLevelRoot.
The PlayerRoot node will be added to the scene.Press CTRL+S to save your scene.
Name it “test.tscn”.
How to Create the Zeldalike Hearts
Now it’s time to create the code for our Zeldalike Hearts. In this section, we’ll set up the index of hearts, configure maximum and current health, and create a system that tells each heart what sprite to show.
Code
Player Health Component Code
In the left-hand sidebar, in the FileSystem tab, right-click the Scripts folder and click + Create New, then Script….
The Create Script window will appear.In the Path field, set the name to “HealthComponent.gd”.
Click Create.
You will be taken to the HealthComponent.gd’s script editor.Write the following code:
#region DETAILS==============#
class_name HealthComponent
extends Node
#endregion DETAILS==============#

#region SIGNALS==============#
signal healthChanged(cur_hp : int, max_hp : int, chang_amt : int)
#endregion SIGNALS==============#

#region VARIABLES==============#

#region Debug Variables
@export_group("Debug")
@export var debug_me : bool
@export var debug_name : String
#endregion Debug Variables

#region Health Variables
@export_group("Health Settings")
@export var max_hearts : int = 3
var max_health : int = 12
@onready var cur_health : int = max_health:
    set(value):
        var new_health = clampi(value, 0, max_health)
        var chng_amt = new_health - cur_health
        cur_health = new_health
        if chng_amt != 0:
            healthChanged.emit(cur_health, max_health, chng_amt)
#endregion Health Variables
#endregion VARIABLES==============#

#region FUNCTIONS==============#

func _ready():
    #region DEBUG HEALTH NOTIF
    var debug_health_notice : bool = false
    if debug_me:
        #provide instructions for health debugging if they have not yet been given
        if debug_health_notice == false:
            print("You can control the player's health with the num pad.")
            print("Press Numpad Key 8 to recover health,")
            print("and press Numpad Key 2 to lose health.")
            debug_health_notice = true
    #endregion DEBUG HEALTH NOTIF

    #region Set Max HP
    #defines the player's max health.
    #since there are 4 hits in a single heart, the player's max health is equal to 4 * their maximum hearts!
    max_health = max_hearts * 4
    if debug_me:
        print("Player Max Health defined as ", max_health, " with ", max_hearts, " hearts.")
    if cur_health != max_health:
        cur_health = max_health
    if debug_me:
        print("Player Current Health is now ", cur_health, ".")
    #endregion Set Max HP

#region Healing
func healed(healing : int):
    self.cur_health += healing
    if debug_me:
        print(debug_name, " gained ", healing, " health.")
        print(debug_name, " now has ", cur_health, " remaining Hit Points.")
#endregion Healing

#region Damaging
func damaged(damage : int):
    self.cur_health -= damage
    if debug_me:
        print(debug_name, " took ", damage, " damage.")
        print(debug_name, " now has ", cur_health, " remaining Hit Points.")
#endregion Damaging

#region Debug
func _unhandled_input(event: InputEvent):
    if debug_me:
        _debug_health(event)

func _debug_health(event):
    if debug_me and event.is_action_pressed("hurt_test"):
        print(debug_name, " is being hurt by an input event!")
        damaged(1)
    elif debug_me and event.is_action_pressed("heal_test"):
        print(debug_name, " is being healed by an input event!")
        healed(1)
#endregion Debug

#endregion FUNCTIONS==============#
What This Code Does
Details Section
This is used to name our script’s class so it can be easily configured elsewhere. We’ll have a field in our PlayerUX that only accepts a node with the HealthComponent class name.
Signals Section
We need a signal to emit, called the healthChanged signal, to communicate with other elements of our scene. This signal is tied to the cur_health variables to avoid repeating code. Any time current health’s value is set (such as by our healed and damaged functions later in this same code), we emit a signal containing valuable data for the rest of our code.
Ready Function
First, we have a debug section in our code that provides you with a notice in the output regarding what keys can use to control the player’s health. Note that if you chose keys other than Numpad 8 and 2, you’ll want to change the text in this section.
After that, we set our maximum health to be equal to max_hearts*4. The reason for this is that a single heart has 4 hits in it, just like in zelda! Max Health works in absolute numbers, not number of hearts, so we need to tell it how many individual hits we have, which is 4 for each heart.
Healing/Damage Functions
Here, we have extremely simple code because the bulk of our code for damaging/healing is actually set in our variable itself! Instead, all this does is subtract (for the damaged function) or add (for the healed function) the value that is passed when we call each function. The debug then tells us how much damage or healing was received and what our current health is.
Debug Functions
Our last two functions are just for our debug. First we get an unhandled input, then we pass that to the debug health code. If it is one of our pre-configured keys for testing hurt/heal functionality, we’ll call the damaged function with a value of 1 (dealing 1 point of damage) or the healed function with a value of 1 (restoring 1 hit point). You can change the values here to any number you want, increasing the amount of damage or healing granted by the debug tester.
Individual Heart Code
Create a new script in your Scripts folder named “heart_gui.gd”.
Add the following code to that script:
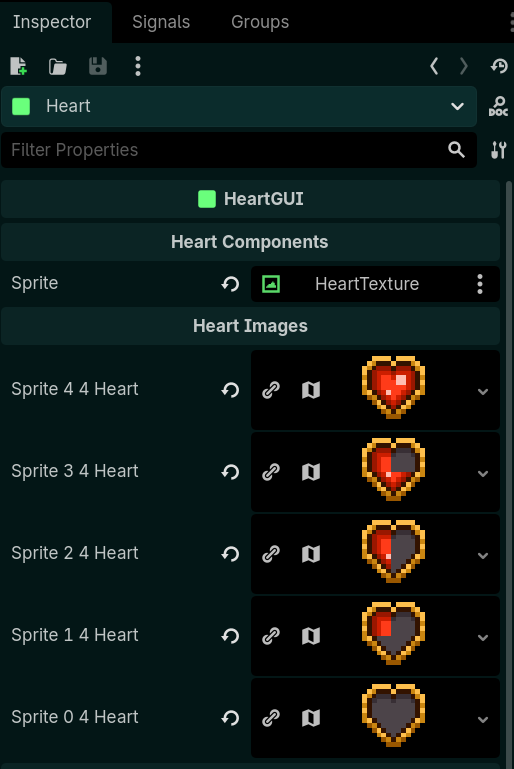
#region DETAILS==============#
class_name HeartGUI
extends Panel
#endregion DETAILS==============#

#region VARIABLES==============#
@export_category("Heart Components")
@export var sprite : TextureRect
@export_category("Heart Images")
##Full heart
@export var sprite_4_4_heart : AtlasTexture
##3/4 heart
@export var sprite_3_4_heart : AtlasTexture
##half heart
@export var sprite_2_4_heart : AtlasTexture
##1/4 heart
@export var sprite_1_4_heart : AtlasTexture
##empty heart
@export var sprite_0_4_heart : AtlasTexture
#endregion VARIABLES==============#

#region FUNCTIONS==============#
##Updates the value of a heart based on its fill rate
func update(update_value : int):
    update_value = clampi(update_value, 0, 4)
    match update_value:
        0: sprite.texture = sprite_0_4_heart
        1: sprite.texture = sprite_1_4_heart
        2: sprite.texture = sprite_2_4_heart
        3: sprite.texture = sprite_3_4_heart
        4: sprite.texture = sprite_4_4_heart
#endregion FUNCTIONS==============#
What This Code Does
Right now, we have not yet configured this code fully. It relies heavily on export values to set itself up. However, once it is configured in the editor, this will match the update value assigned to a heart (which will be set up in our next script) to the appropriate heart sprite’s atlas texture.
Heart Container Code
Create a new script in your Scripts folder named “heart_grid.gd”.
Add the following code to that script:
#region DETAILS==============#
class_name HeartGrid
extends GridContainer
#endregion DETAILS==============#

#region VARIABLES==============#
@export_category("Debug")
@export var debug_me : bool = false
@export var debug_name : String = "Hearts Grid Container"
@export_category("Hearts Display Components")
@export var heart_gui : PackedScene
@export var root : Control
#region VARIABLES==============#

#region FUNCTIONS==============#

func set_max_hearts(max_hearts : int):
    for child in get_children():
        child.queue_free()
    for i in range(max_hearts):
        var heart = heart_gui.instantiate()
        add_child(heart)

func update_hearts(cur_health : int):
    var hearts = get_children()
    for i in range(hearts.size()):
        var heart = hearts[i] as HeartGUI
        var heart_fill_value = clampi(cur_health - (i * 4), 0, 4)
        heart.update(heart_fill_value)
#endregion FUNCTIONS==============#
What This Code Does
Variables Section
We’ll be filling out these variables with our heart gui scene shortly and the Control node will be the player_ux control node.
Functions
Again, our functions are quite simple! First, we set our maximum hearts based on the max hearts received when this function is called, then we create a single heart for our array based on the number of maximum hearts, adding one for each heart that should be there.
Another function can then be called for updating the hearts to ensure it aligns with the player’s current health. This is where we set the heart’s fill value based on the current health value, giving each heart a value between 0 and 4. After that, we call that heart’s update function.
Player UX Code
Create a new script in your Scripts folder named “player_ux.gd”.
Add the following code to that script:
#region DETAILS==============#
class_name PlayerUX
extends Control
#endregion DETAILS==============#

#region VARIABLES==============#
@export_group("Debug")
@export var debug_me : bool = false
@export var debug_name : String = "Player UX"
@export_group("PlayerUX External Components")
@export var player : Node2D
@export_group("PlayerUX Internal Components")
@export var hearts_grid : HeartGrid
#endregion VARIABLES==============#

#region FUNCTIONS==============#
func _ready():
    var hp_component : HealthComponent = player.health
    hearts_grid.set_max_hearts(hp_component.max_hearts)
    hearts_grid.update_hearts(hp_component.cur_health)
    hp_component.healthChanged.connect(_on_health_changed)

func _on_health_changed(new_hp, _max_hp, _change):
    hearts_grid.update_hearts(new_hp)

#endregion FUNCTIONS==============#
Player Code
Create a new script in your Scripts folder named “player.gd”.
Add the following code to that script:
#region DETAILS==============#
class_name Player
extends Node2D
#region DETAILS==============#

#region VARIABLES==============#
@export_group("Debug")
@export var debug_me : bool = false
@export var debug_name : String = "Player UX"
@export_group("Player Components")
@export var health : HealthComponent
#endregion VARIABLES==============#
What This Code Does
This code looks insanely simple for a player script, and that’s because it is! In this project, our ‘player’ is really just an entity that holds a bunch of data (though for this specific tutorial, the player won’t be holding more information than a reference to the Health Component). If you continue on with this project, you could easily add more export variables for things like Stamina Components, Magic Components, etc.!
Connecting the Scripts and Nodes
Now it’s time to add these codes into our scenes and connect everything as needed.
Attaching Scripts
In the player_ux scene, click PlayerUX in the Scene tab’s tree on the left-hand side.
In the Inspector tab on the right-hand side, in the Node category, Click the Script field, then click Load….
The Open a File window will appear.Double-click the Scripts folder, select the player_ux.gd script.
Repeat steps 1-3 to assign the heart_grid.gd script to the HeartsGridContainer node.
In the player scene, right-click the ComponentManager node in the scene tree, then click +Add Child Node… and add the HealthComponent node.
Click the PlayerRoot node and, following steps 2-3, add the player.gd script to this node.
In the player_ux_heart scene, follow steps 1-3 to add the heart_gui.gd script to the Heart node.
Configuring Script Settings
Player_Ux_Heart Configuration
In the player_ux_heart scene, select the Heart node.
Drag the HeartTexture node to the Sprite field in the Inspector.
Drag the heart_full.tres resource from the Atlas Textures folder into the Sprite 4 4 Heart field.
Repeat step 3 to add the remaining atlas textures to their respective fields.
Player_UX Configuration
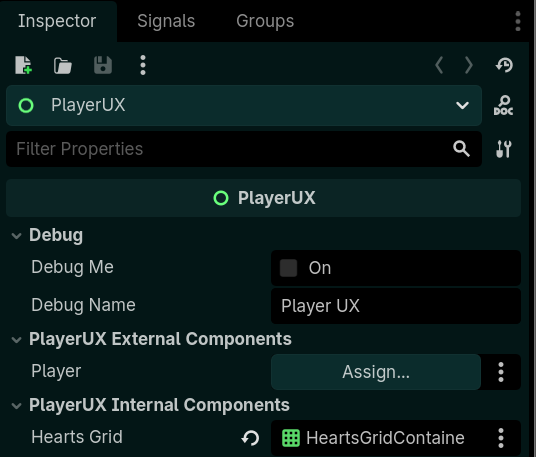
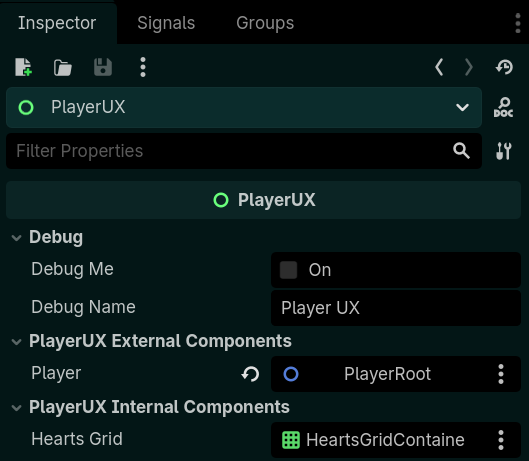
In the player_ux scene, select the PlayerUX node.
Drag the HeartsGridContainer from the scene tree to the Hearts Grid field in the PlayerUX Internal Components section in the Inspector.
Select the HeartsGridContainer node.
Drag the player_ux_heart.tscn scene from the Scenes folder in the left-hand sidebar into the Heart GUI field of the Inspector.
Drag the PlayerUX node from the scene tree into the Root field of the Inspector.
Player Configuration
In the player scene, select the PlayerRoot node.
Drag the HealthComponent node into the Health field in the Player Components section in the Inspector.
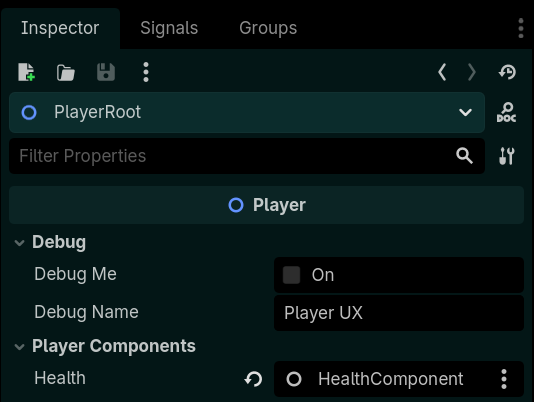
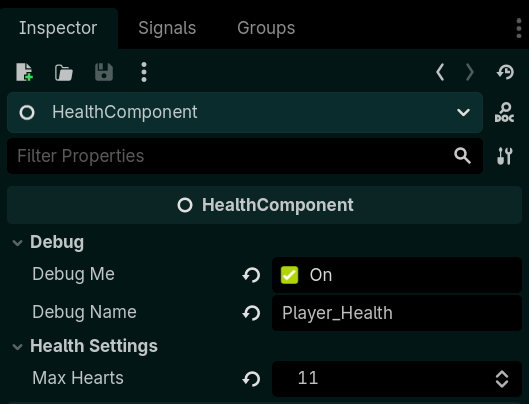
Click the HealthComponent node.
In the Inspector, Check the Debug Me box, then set its Debug Name to “Player Health”.
Set the Max Hearts value to any number of 11 or higher. This will test the functionality that creates a new row of hearts when there are 10 or more in the grid.
In the scene tree, select the PlayerUX node.
Drag the PlayerRoot node from the scene tree into the Player field in the Inspector.
Testing
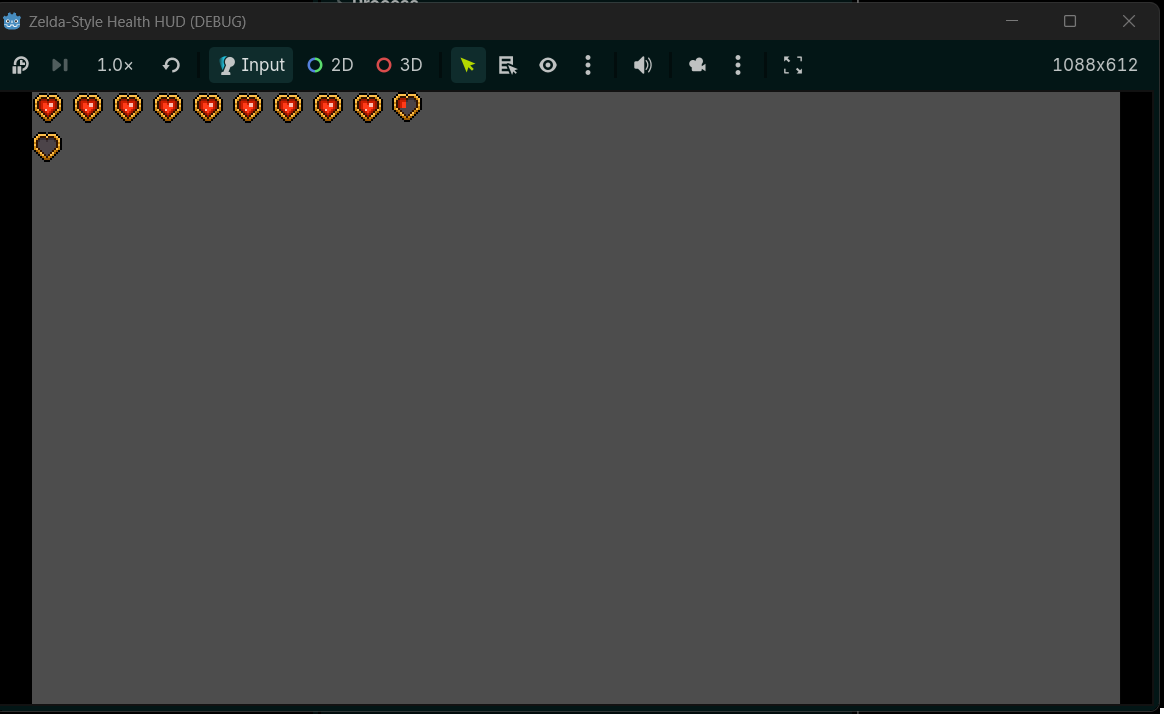
Open your test scene.
At the top of the Godot Engine window, click Play Scene.
The Debug window will launch, playing your scene.You should see all of your hearts and, if you press Numpad 2, the hearts should decrease one step at a time, while Numpad 8 will increase them!
Conclusion
This heart system is bare-bones, but easy to expand on! In a future tutorial, we’ll add things like causing the active heart to become enlarged and start beating while all remaining hearts will pulse red when the player is at low health.